How I would Further Improve Mailbox App

Mailbox

The famous Mailbox app in iOS has finally arrived for Android users, and again it’s a very disappointing move from a company under Dropbox. It’s fine (actually not) to have the Android platform as the second thought of your app/services, but why some of these companies doesn’t just show some Android love by making things familiar and easy for Android users?

I am sure I will hear ‘Taylor, it’s about consistency. Our PdM requested to make it looks all the same across platform, so people gets familiar instantly! And it also provide consistency in the branding and marketing!’. My ass.

My Redesign Suggestions

  • Go consistent with Android UI patterns and building blocks. You can keep some of the unique elements while not breaking the Android Design Guideline.
    • The user of navigation drawer indicator (change color depending on the page)
    • Use the tab style in Android
    • DON’T block the notification bar by your syncing/refresh/whatever you call bar. Just use crouton to display the progress in-app.
    • May be use path-tracing for the loading indicator?

Inbox

  • The color of the elements can be consistent to the different screens, so it keep that uniqueness in mailbox.

Later

  • Check Confirming and Acknowledgement page in Android Design Guideline. Positive (Delete in this case) action should be always on the right side.
  • Why control the user behavior? So now I can’t write a draft when I have some free time? Why the force of deletion?

Delete Cancel

  • Being a mailbox app that encourages users to organize their mails in different categories (read, dismiss, list, later), I find it really strange to place those actions on the top. Once you finish reading the mail (most of the time), you focus will be at the bottom part of the screen, and it’s way easier and natural for the user to reach the buttons at the bottom for organizing the mail.

In Mail

Since they have hacked around to make certain things work differently from what Android has to offer (like the notification bar on top of your notification bar), why not spend a little bit more time to polish it up for Android users?

What do you think?

Advertisement

Android UI/UX Tips #5

Another month, another UI/UX Tips article!  This time I looked into the swiping action between tabs, proper handling of multiple notifications, proper dialog actions, and some smart use of colors to indicate different states.

Swiping between Tabs, Please

Tab Swiping

I think this has been mentioned many times by Android Developers Team, as well as some Android Designers. If you are using tabs in your app, please please please, make sure they support the swipe gesture. It is a system-level interaction pattern, and it is clearly mentioned in the Android Design Guideline. Your users won’t be happy to realize that they can’t swipe to change tabs, which is extremely useful when the device is used with one hand.

Properly Handle Multiple Notifications

Multiple Notification

In a previous version of Google Drive, when you try to upload multiple files in a session, you will get the notification spams (shown in above image), fortunately, it has been fixed in the latest update. If your app can create multiple notifications with some user actions, please make sure that they are handled properly – group them and show the relevant information.

Proper Dialog Actions

Dialog Actions

Sometimes developers/designers tend to overlook the actions available to the user in a dialog. In this shown example, when I was shown with this dialog, I have no way to confirm my selection of font unless I press the Cancel button. This is very confusing for the user,  and definitely not designed according to the Android Design Guideline. Ensure that whenever there is such selection dialog, dismissive and affirmative action buttons are there for the user.

Smart Use of Color for State Indication

Color 1
Color 4
Color 3

Above shows some great examples from recent updates for Google Current and Google+. These are very subtle, yet informative approaches to notify the user about the state, so do consider for such approaches whenever your app requires to give the user some information/feedback regarding the state of something in the app. I really like these!

That’s it for this Android UI/UX Tips! Feel free to share around if you find these information useful, and as always, hit me with comments if you have any.

Android UI/UX Tips #4

It has been a while since the last Android UI/UX Tips, but I still continue looking for things that can be improved whenever I have some time to find them or actually experiencing them myself.

I am not sure if I can say I am happy with the release of Android 4.2 in terms of UX, especially with the decision to include the Quick Settings panel that isn’t much useful, and a strange bug on the date picker for Contacts app which should be fairly simple to detect if the testing is done thoroughly.

In any case, let’s look at some UI/UX tips that I would like to share.

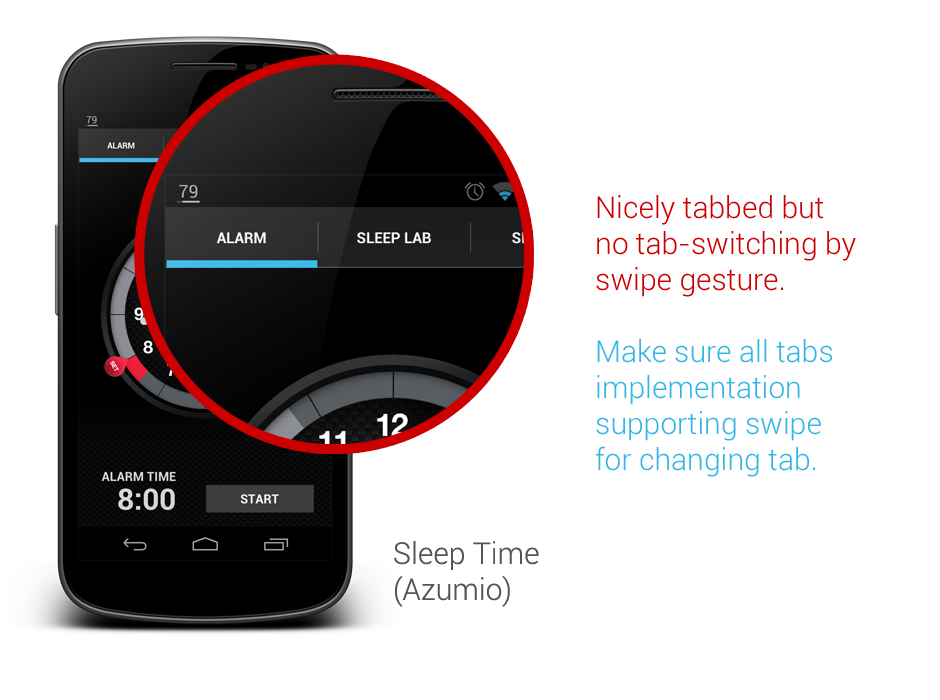
Tabs should be placed on top

In Android Design Guidelines, it has clearly suggested that tabs should not be placed at the bottom, since it is a very iOS UI element and doesn’t fit in too nicely in Android interaction behavior.

However, looking at the recently released Beta build of Echofon – there you can find the ignorance from the development team.

One of the main justification for placing the tabs at the top is that the user will have hard time to see which tabs he/she is currently in while swiping across the tabs (try it on a phone device). Juhani also written a great article few months back to justify the placement of the tabs should be at the top.

So my advice, try not to ignore the guideline and do not invent new UI element that doesn’t help in enhancing the UX.

Use Simple but Precise Words

Sometimes it is unavoidable for developers/designers to add some words to explain certain things in the app, like instructional guides or options in Settings page. However, it is not hard to find some bad examples in the apps world, either they used long but unclear explanations, or some simple words that simply can’t explain clearly for certain options/features in the app.

One example that I would like to show here is the new Gmail app that comes together with Android 4.2. If you are an early adopter of Gmail app version 4.2, most probably you are aware that it finally has a pinch-to-zoom feature for the email content. However, it is not turned on by default. And what’s really surprising here is that even the option to activate that feature is in the Settings page, many (including myself) have overlooked the existence of this option. Some might blame themselves for the overlook, but really this is actually an UX related issue.

The words that they used to explain the option isn’t something really straight to the point – especially the word ‘auto-fit’, I am not really sure if there is anyone familiar with it. The further explanation might clear the confusion a little bit, but definitely it can be improved. I am sure if it change to Pinch-to-Zoom Content with the explanation Automatically fit the message to the screen and allow zooming, 90% of the people who overlooked this will be able to turn on this feature without having a doubt, and it is also clearer to any new users, I supposed.

Therefore, simple but precise wordings/messages to the user is the key to avoid miscommunication or feature overlooks.

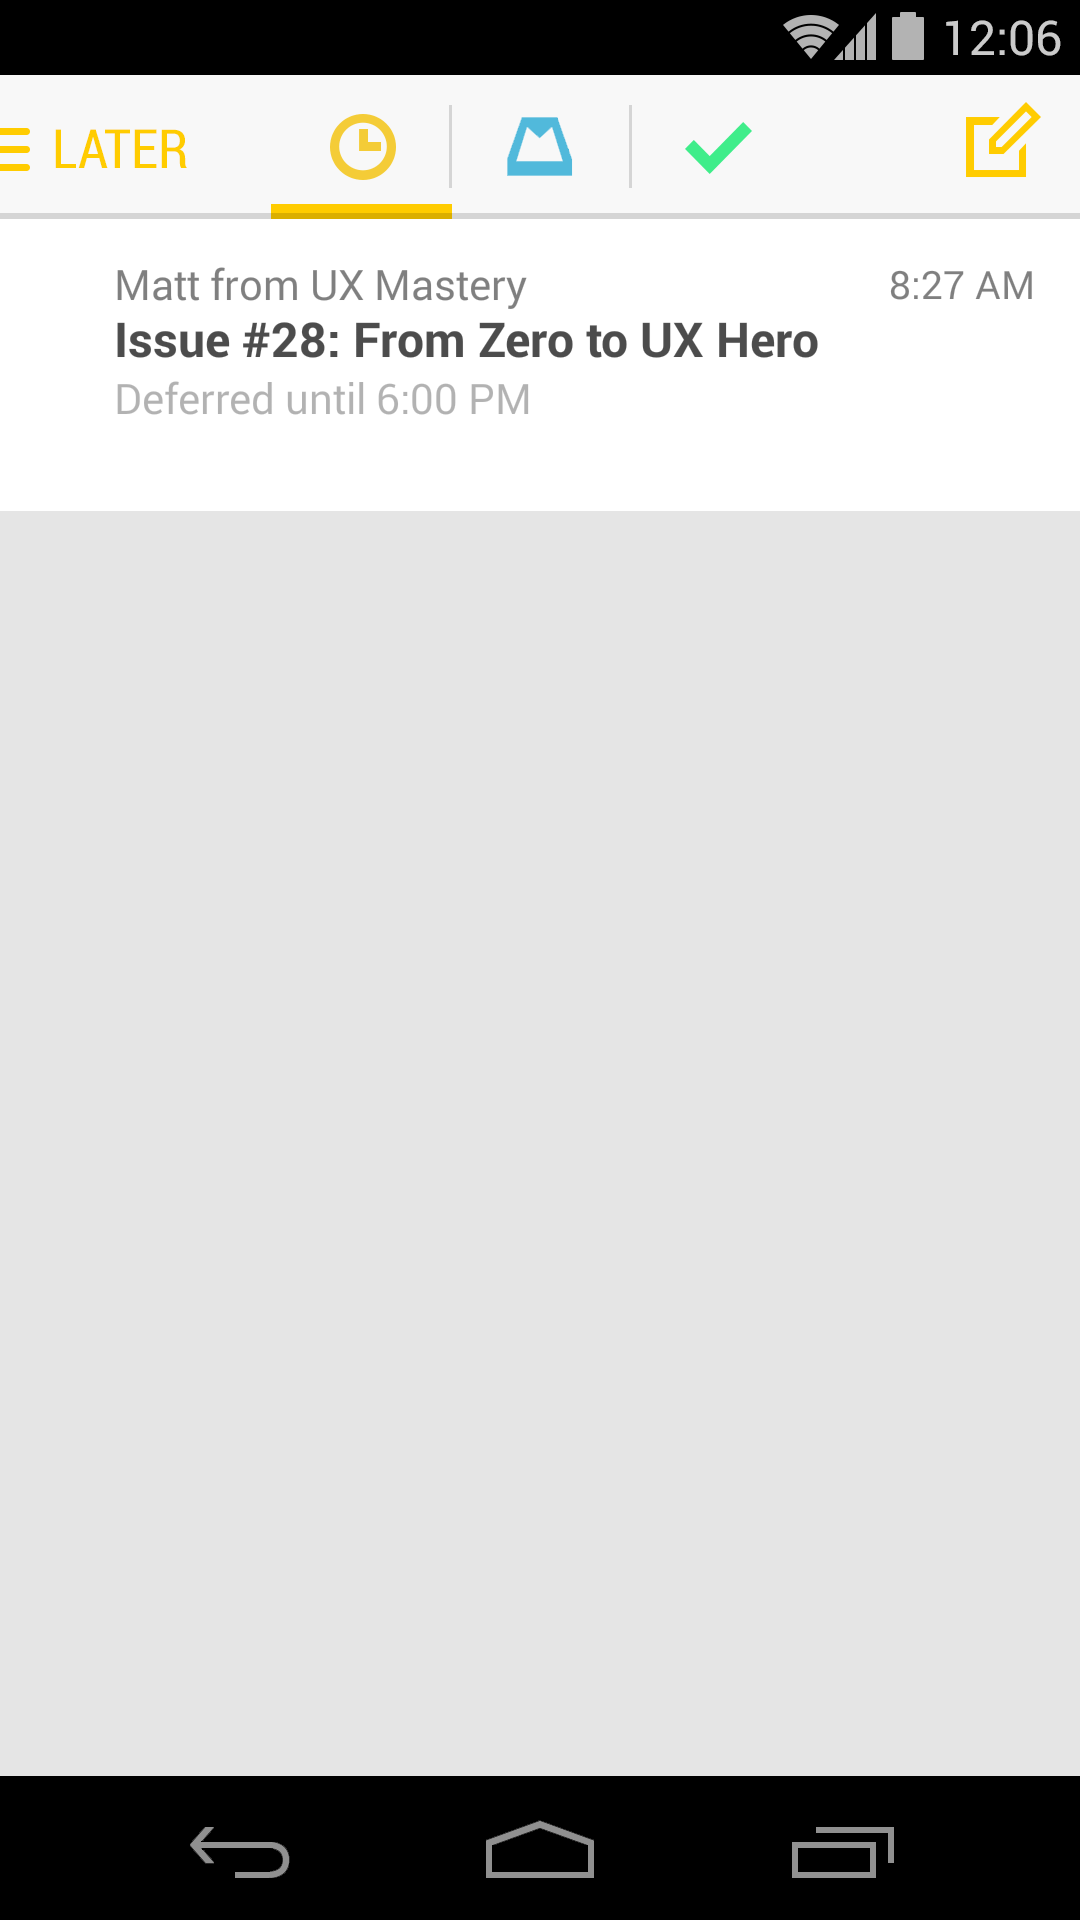
Ensure proper UI presentation

It’s a pity that the stock Email app doesn’t get any updates ever since ICS (at least I am not aware any of them). In Android UI/UX Tips #1, I have questioned on the navigation buttons in the app, and now I have found more things that can be improved during my daily usage.

If you need a borderless button in the middle of UI (in this case the Email app), please make sure that the user should be able to press it anywhere along the entire button area, otherwise if you would like to make it work only on a specific area, remember to use a vertical separator. Gmail app is doing this absolutely right.


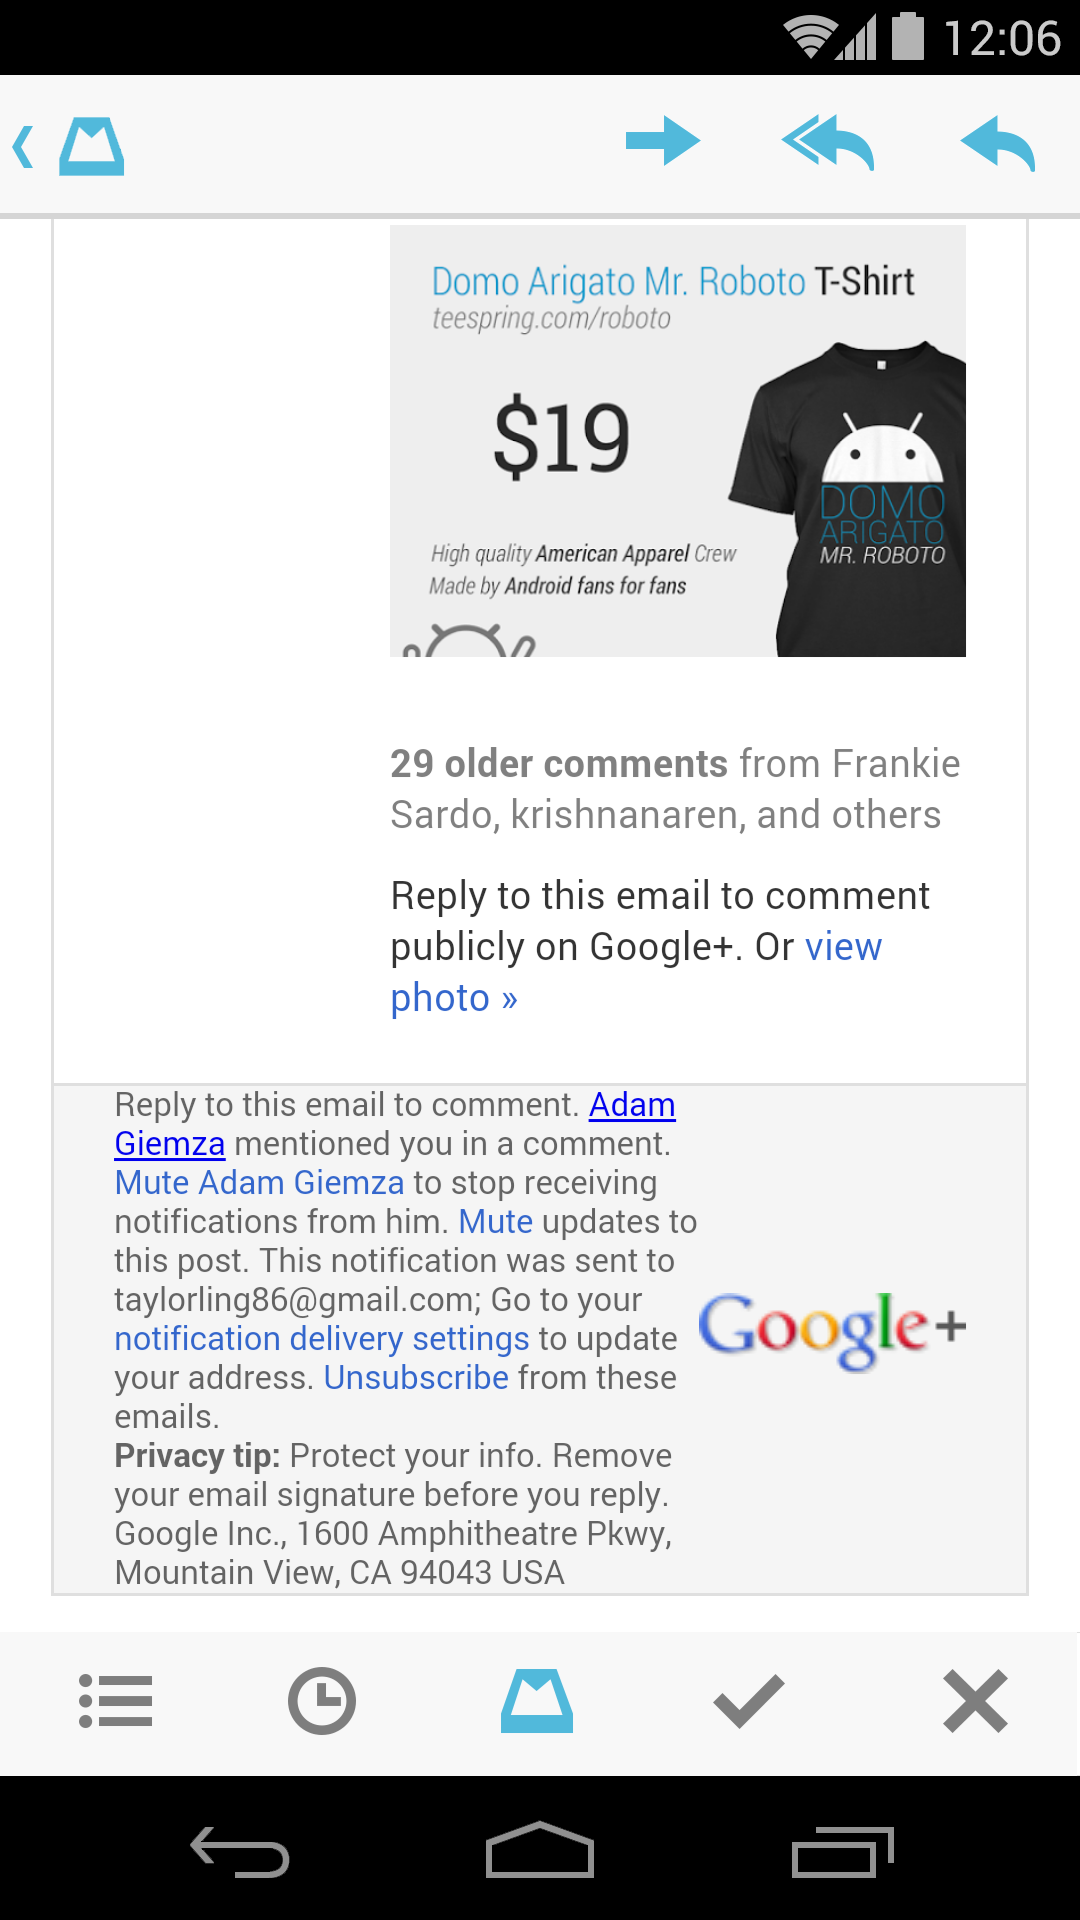
Ensure Action Hints are working properly

While it doesn’t seems to be a crucial feature, but I would really make sure that the Action Hints are always working correctly, showing the helpful hint to the user about the iconized buttons.

In Email app, when you long press on the navigation button, it actually show the Action Hint toast box without any text in it. This should be avoided – it doesn’t provide any helpful hint to the user and it doesn’t give any good impression on the app quality either.

That’s all for this Android UI/UX Tips! As usual, hit me with comments if you have any.

Android UI/UX Tips #3

In Android UI/UX tips #3, I have looked into some apps with the following UI/UX problems:

  • Hidden Status Bar (UX)
  • Outdated Action Bar and low-res icons (UI/UX)
  • Bad offline handling (UX)
  • Obstructive UI elements (UI/UX)

Hiding Status Bar? Do it Properly!

Some of the app designers/developers didn’t realize that the Status Bar is actually part of the System Bars, therefore if you decided to play around with it to get the maximum screen estate for your app, you have to do it right.

Let’s take RepliGo Reader as the first example. The app is actually pretty good in terms of features and UI, but I didn’t quite like the way it handles the Status Bar. It only allows the user to choose between Always Hide or Always Show option during Reading Mode, which is kind of limited. If they can also include a Show/Hide Together with Other Controls option, then it will be a pretty great user experience, and this should be the default behavior. Look at Google Play Books app, it handles the Status Bar nicely.

Another app that worth mentioning for this issue (which actually bothers me since Jelly Bean) is the stock Gallery app in Jelly Bean. This app has two issues with the Status Bar:

  • In Landscape mode, Status Bar disappeared and there is no way to bring it back.

This is one bad UX example in stock app. Given the importance of the Status Bar in Android device, my suggestion is don’t hide it in any screen mode unless the user is well aware of some method to call it (tap anywhere to show it, for example).

  • In Portrait mode, the black bar of the Status Bar permanently stays on the screen in Viewing Mode (only in Jelly Bean).

I am not too sure if there is anyone noticing this but this is pretty frustrating for me. I have been using Gallery app to view my app mock up in full screen (which I just need to trim off the bottom Navigation Bar), and it doesn’t work anymore because the black bar of the Status Bar is now taking up the Viewing Mode space as well. Thus, if you are going to hide the Status Bar in your app, hide it completely!

Use the new Action Bar and High Resolution Icons

With the release of the awesome ActionBarSherlock library that allows the developer to implement the ICS/JB Action Bar with full compatibility from Android 2.x, personally I am not too sure why there are tons of great apps still decided to stick with the older (and less aesthetic) Action Bar design and/or low resolution icons. Besides making your app feel aged, it doesn’t give any good impression to your user if your app using lower resolution icons – remember, Action Bar is one important UI element in Android Design which is always visible to the user. Some examples below (I am sure you can find more):

So, forget about the old Action Bar and start designing/redesigning/developing Android app using new Android Design!

Properly Handle Offline Situation

It’s true that most of the apps nowadays require internet for their full capability, either to get new information or for syncing purpose, however, we cannot expect our user are always connected to the internet, therefore you have to properly handle the situation when the device goes to offline.

I had this issue with The Verge app which actually crashes when I try to play around with the app offline. Definitely not a user experience that you would like to introduce into your app. Handle it with a simple toast or a warning message regarding the offline status would have solve the issue.

Obstructive UI elements is a no-no

It is so awesome that Android developers have numerous of great libraries for certain UI elements implementation, but once you have used those libraries; you are basically responsible for everything that you decided to show to the user.

One bad example of this is, again, The Verge app, which shows the Pull-to-Refresh indicator and overlapped with certain UI elements in the app (one of the examples shown above). I am not too sure the complexity in technical terms, but I assume it won’t take months to remove it? Publishing your app in such condition will only give bad impression for your app overall quality.

Hope these UI/UX tips help! As usual, don’t hesitate to leave your comment!

Android UI/UX Tips #2

After publishing the 1st Android UI/UX Tips, it seems that I am able to find more UI/UX mistakes in various apps (perhaps I become ultra-sensitive now?), so here it is, Android UI/UX Tips #2 to inspire Android Designers/Developers in developing app with awesome UI and UX.

Don’t Make it Hard for The User

If your app have some awesome features that simplify user interaction, think thoroughly when to/not to remove it from your app.

One example that I would like to show is the Update button in Play Store app. When there are more than one apps require update, the Update button is very useful. Updating all the apps will only take one touch. But, when there is only one app having update, the Update button mysteriously disappeared. The problem is, now to update that particular one app, three touches are required (Select the app > Click Update > Click Accept & Download). I personally do not see any use case requires such interaction design – if you can do the same for multiple items, you should be able to do it for a single item.

Consistent with Android Design

In Google Drive app, most of the dialog in the app are using the basic button, which looks really ugly and inconsistent with Android Design. The buttons in default dialog in Android should be (I am not sure) already using the borderless buttons, so I am just feel like asking the Google Drive developers:

Why make the dialog looks like a Microsoft Windows dialog?

No Double Up Combo, Please

Astro File Manager has a new update with refreshed UI, and it comes with a double Up combo! As I mentioned in my Google+ post, it is definitely unnecessary and downright ugly. Just use the app icon for better identity establishment. Perhaps the app designer want to help enhancing the Up affordance?

Consistent with Icon for User Interaction

Again, it’s Google Drive. In the Detail View of a file/folder, you can see there is a Done button (Tick icon) in the Action Bar, and a Cross icon near the file name. You might think that the Cross icon is meant for the file/folder itself, perhaps for deletion or discarding changes? Nope. It behaves exactly the same as the Done button, and this is really a confusing design. In Android, the Cross icon usually meant remove, discard, or cancel. This is not Microsoft Windows. Just stick with the Done button at the Action Bar and it will be just nice.

That’s all for Android UI/UX Tips #2! Hope it is inspiring!

Android UI/UX Tips #1

Realizing that it is almost impossible to write a post for each of the UI/UX tips that I have in mind (except those worth a discussion), I have decided to occasionally come out with Android UI/UX Tips.

So in the 1st Android UI/UX Tips, I will look into some official Android apps by Google (Google+, Google Drive, Email), as well as TED app, and talk about some UI/UX mistakes in them and their possible UI/UX improvements.

Avoid Using Confusing/Inappropriate Color

Color, especially when it is related to interface elements, is an important factor in designing great UX. When it is used correctly, it can provide immediate feedback or information to the user and create confidence in user interaction.

Google+ Send Button

I am not sure if it is a bug, but the Send button in Google+ app doesn’t change color (or the grey level) to indicate the button state. This is definitely one bad UX example. Due to the nature of touch interface (there is not mouse over or tooltip), users will have to rely on the visual clue for the state of user interface element. Change the color of the Send button to a darker grey when there is some text entry should already solve the confusion.

Action Bar Icons in TED App

The Action Bar icons in TED app are designed well for their action (although they seem to be a little bit ‘fatter’), but they have an inappropriate grey color – they looked too much like disabled buttons, or in other words, the grey color is very unfamiliar. Sure, you can argue that the color choice is due to the pure white Action Bar in the app, but the app doesn’t use the suggested Action Bar icon color for light theme. Using the color scheme meant for Holo Light (#333333, 60% Opacity), they will definitely give more confidence and familiarity to the user, as well as consistent with Android Design Guideline on Iconography.

Deleting Message in Google Drive

Even though Google Drive is a pretty unpolished app, I still would like use it as an example. In Google Drive app, when you confirm a file deletion, the Deleting… wording is in a welcoming green color. For this case, I would prefer not to ignore the language of color. Every color has their own associated meaning – Red means Stop/Attention, Green means Go, Orange indicates Warm and Blue indicates Cool. Therefore, it probably make more sense if the message is in red color to grab the user attention about the file deletion. It will be even better if those dialogs in Google Drive get a revision.

Avoid Unnecessary (And Ugly) Navigation

Navigation, one of the most important part of touch interaction, can cause serious user frustration if it’s not done right. Fortunately with the official Android Design Guideline for Navigation, it should not be a difficult task to do it right. But if you want to know how to do it wrong? Check out the stock Email app.

It’s a surprise to see the stock Email app doesn’t have that swipe navigation system found in official Gmail app. In the stock Email app, a button-based navigation is used in Detail Views. It does not only take up some precious screen estate, but it is also destroying the aesthetic of the app, especially in Landscape mode. Swipe navigation and the thin indicator in Gmail app is already a much better solution for this. Otherwise, integrating the navigation buttons into the Action Bar is also a feasible solution (Just to be fair, the Phone version of Email app does have the navigation buttons integrated in Action Bar, and I am not sure why it doesn’t do the same on Tablet version).

Hope these tips help in crafting awesome app with great UI/UX elements. More tips coming in the very near future (if I have any)!

Side Navigation UI Pattern in Android, Part 2

Well, this topic might be a little bit old since the last bunch of discussions, but I still have a little bit more to talk about this UI pattern that I have missed in my last writing and also some new idea popping-up since last month.

I personally still think the Side Navigation (a.k.a Fly-in menu, Sliding Menu, Nav Drawer etc.) in Android is pretty interesting even though it is not a relatively new UI pattern – it allows a fresh (and better?) navigation style on small screen mobile devices, and it helps in efficient use of screen estate for content. A number of apps are already using it (each app has slightly different kind of behavior and interaction though) even though it is not (yet) an official Android UI Pattern, which is always great for Android development scene because innovation doesn’t stop at stock design/pattern. However, I really think it’s time to have some consistency and guideline for this UI pattern for better user experience because I can foresee more apps will be using this, only with different kind of behavior. Some of the official Google apps like Google+ and YouTube are using it mainly for navigation purpose, but unfortunately they are not good example since the Side Navigation implemented has different interactive behavior.   

More tips and suggestions

Some extra suggestions from me since the last one if you are looking into Side Navigation for your app:

Don’t confuse the user

This is like the #1 UX rule if you really care about the user. The latest update of Google+ app during the launch of Jelly Bean is pretty awesome, and I think most of the Android user will agree with me. The Card Style pattern (which is another interesting UI pattern) offers some fresh experience into social networking app, and the redesigned Side Navigation menu since the last one is great – but not the visual indicator for it. The Up affordance are still used for it, and it will further confuse the user with the Up affordance when there is already user confusion in Up and Back affordance in Android 4.0+. My suggestion: If you really have no better idea on the visual indicator, use an icon for it (eg. Facebook and Prixing), or just the app icon (eg. Evernote), but please do not use the Up affordance to confuse the user.

Bezel Swipe, please

As mentioned previously, I still think Bezel Swipe is a great match with Side Navigation. It is very easy to understand, and bezel swipe isn’t something hard to perform on a mobile device, though I would have to agree that discoverability might be an issue for it. Another reason that I think Bezel Swipe should be there – most of the apps that have Side Navigation, for example Google+ and YouTube, allow the user to touch and hold the main activity and swipe-closing the Side Navigation (try to hold the main activity and swipe to left side), and this user-perceived closing animation can introduce the user expectation of swipe-right-to-reveal gesture for Side Navigation. Try Dolphin Browser HD and Prixing, I think it is completely make sense.

Improve Discoverability (and create curiosity)

Well, this isn’t something new. Every now and then, there are new UI patterns and new user interaction invented in mobile apps. To make the user aware of your new UI patterns and/or user interactions, what you can really do is improve the discoverability of those new patterns. As I said, Bezel Swipe/Side Navigation might have issue in discoverability, so just don’t stop there after the implementation.

  • Introduce it in the first run tutorial and let the user play around with it.
  • Make the Side Navigation a little bit more obvious when the user first running the app – a great example for this is the Prixing app which make the Side Navigation panel ‘jump’ when the user first entering the app, creating user curiosity.
  • Use a good indicator to represent the Side Navigation.

They are not perfect solution for the discoverability issue, but those are some possible improvements.

New indicator?

After some suggestions in the previous post, I am still actively thinking for new indicator that can be used for the Side Navigation. Below are some of my new idea, what do you think?

Conclusion

I really like Side Navigation pattern and I think it is especially useful in mobile devices with small screen, but it’s pretty important that the user experience that comes with it has to be carefully crafted so it doesn’t cause user frustration and confusion. If you are looking for some reference while implementing, I strongly suggest you to look into Prixing.

For developers, if you are looking for library for this UI pattern, you must check out the SlidingMenu library by Jeremy Feinstein. It uses Bezel Swipe which I prefers a lot and generally it has quite some good reviews.


Avoid This UX Mistake in Play Store App at All Costs

After a rant about the app screenshots in Play Store, another not-so-great UX in Play Store that I experienced for quite some time is a pretty frustrating one, and I thought this is something Android Designer/Developer should avoid at all costs.

Last Position or Top of the List?

Imagine this scenario: You are scrolling through a long list, and found something interesting in the middle of the list, so you click on that item to get more information. After that, you want to go back to the list and continue the search.

Question: When you go back to the list, do you expect to go back to the position in the list where you left off, or to the top of the list?

My answer: Definitely the position in the list where I left off.

Back to Top of the List Shouldn’t Be Automatic

But Play Store app developers don’t think so. In My Apps section, both INSTALLED and ALL tabs are having this UX mistake. Want to try yourself? Grab you device, go to Play Store > Overflow button > My Apps. Go to ALL tab, scroll down a little bit deeper, click on any app. Once you enter the details page of the app, click Back button or Up button. Now, see check the list. You are on top of your list. Frustrating, no? You can find the same UX mistake when you are searching for apps in Play Store app too.

I don’t recall any of the official Google apps giving me such frustration. I am not too sure if there is any specific reason from them to design/implement it in such a way, but I don’t see any value or advantage except causing user frustration and confusion.

Back to Top shouldn’t be automatically done until the user requested it, or at least the user should be aware of it. So, please, Android Designer/Developer, avoid this UX mistake at all costs.

App Screenshots Without Navigation Bar, Please?

This is just a minor entry for the blog about something that has been bothered me for quite some times (call me a nitpicker). Ever since the release of Galaxy Nexus with the Navigation Bar (the black bar with Back, Home and Recent apps buttons), there are more and more apps in the Google Play Store actually have it included in the screenshots. I fully understand that it’s not the developers fault – Google Developer Console actually asking for the screenshot with some standard resolution, which means that the Navigation Bar has to be included in the app screenshot without a choice.

Navigation Bar in Screenshots is Redundant

App screenshots are the most direct and quickest preview to the users for your app, therefore ideally they have to be shown on the user device which looks like it is in action. However, most of the screenshots nowadays include the Navigation Bar, which is completely redundant in my opinion. Why? Let’s have a look for some examples when I view those screenshots from Galaxy Nexus and Nexus S:

Not sure if you have the same opinion, but I don’t see the value of including that Navigation Bar in the screenshots. If the screenshot is meant for Galaxy Nexus, the Navigation Bar obviously is redundant since the device already has the Navigation Bar, and the screenshots have to resize due to the larger size. Plus it just feels awkward to view the screenshots that include Navigation Bar on devices that already have them in hardware form (e.g. Nexus S).

Workaround?

I don’t really have a solution for this since the Google Developer Console requires the screenshots to be uploaded at certain allowed sizes (320 x 480, 480 x 800, 480 x 854, 1280 x 720, 1280 x 800), which I really hope they will consider including resolution without the Navigation Bar/Combined Bar.

The only workaround that I would suggest for now is: Upload the screenshots at 480 x 800 (without the navigation bar, of course), which view perfectly on hdpi devices like Nexus S, and still looks quite OK on xhdpi devices like Galaxy Nexus.

What do you think?

New to Android Design/Development? Here’s a list of great resources and references available

Android Development Tutorial and Reference

Android Design Guideline and Design Resources

Android Design Patterns, UI, Layout

Android Apps Showcase and Collections

Android Newsletter

Feel free to drop me some link for any awesome resources for Android Designers and Android Developers!