
 I have been using Photoshop to make UI animations for my work and it works surprisingly well (at least for me). Of course, Adobe After Effect is still the best tool to create complex and awesome animations, but with Photoshop, you can still create some simple and high quality UI animations to preview the animation idea to others. With some combination of animation properties, you can definitely create some rich animations that is sufficient for discussion. There are certain limitations in Photoshop compared to After Effects (of course!), but for someone who wanted to just use one tool for UI Design + simple UI Animations, Photoshop is one of the best tool that you can get (even if it’s not really designed for UI design).
This tutorial #1 will cover some basic procedures to create simple animations using the Timeline feature in Photoshop CS6+ (no GIMP or older Photoshop), so if you are totally new to this, I hope you will find this tutorial helpful for your first step in making UI animation using Photoshop. Let’s begin!
Prepare for Animation
- Create a new document at 1080px x 1920px
- In the new document, create a new circle shape at 168px
- Activate Timeline window (Window > Timeline)
- Click Create Video Timeline button
- At the right top corner of the Timeline window, click to show the menu, then Set Timeline Frame Rate…, and set it to 60fps.
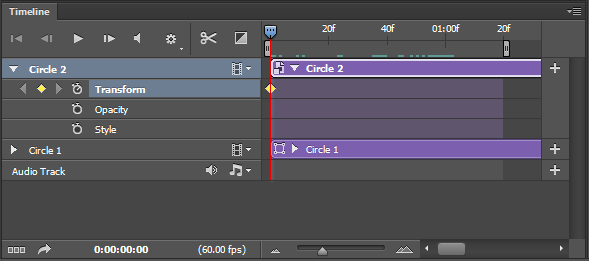
If you are totally new to this Timeline feature, here’s some brief introduction to certain sections that you will always dealt with when you are creating UI animation:

- Timeline Playback Control – Use to play/pause the timeline. Most of the time, you will only use the Play/Pause button. You can adjust the playback resolution and set loop playback via the Settings icon.
- Animation Properties for Document Layers – Here you can find the animation properties that you can adjust for a layer in the timeline. In the example above, there is a shape named Circle 1, and you can change it’s position, opacity, style etc.
- Timeline Work Area – This is the work area of the timeline where you will place the keyframe(s) that represent start and end states for a property. You can also move and adjust the layer duration bar (the purple bar) by dragging the bar itself and dragging either end of the bar, respectively.
- Time Ruler – The upper part is the label for the timeline unit. 01:00f means 1 second of frames (timecode) – if you have set the timeline frame rate to 60fps, it means that there are 60 frames within 1 second. Below the timeline label, there are 2 draggable handles (left and right) which represent Start and End of work area, respectively. If you press Play button, Photoshop will play the frames from the Start point to the End point. The blue handle with red line (current-time indicator) indicates the current frame previewed in the document window.
- Zoom slider – Here you can zoom in/out the timeline. For precise control to a single frame, it’s always better to zoom in the timeline so you can have a clear view of each frame within the timeline.
Now you are pretty much ready for the first task!
Move from one point to another point
Let’s start with the basic, shall we?
STEP 1
Make sure the current-time indicator is at Frame 0 (the most left). Click on the stopwatch for Vector Mask Position for Circle 1 and you should see a keyframe has been inserted into the work area. (Position properties will not work for shape – it only works for rasterized layer)

STEP 2
Now, move the current-time indicator to 01:00f. Move Circle 1 to the right. Once you moved the circle, noticed that there is a keyframe added for you automatically at the timeline. This keyframe is added because you have moved the circle from the original position.

STEP 3
Try to slowly drag the current-time indicator back to Frame 0. Noticed that the circle is now moving back to the original point? Congratulations! You have done the first step!
Takeaway: This basic idea is very important to capture because almost every animations/transitions will be done in a similar pattern – setting the start state and end state for the appropriate properties, and Photoshop will automatically tween the changes in between them in a linear fashion.
Getting excited already?
Move and Fade Out
You may already noticed that there is also a property for Opacity – that’s right – this will be used to animate the fade in/out effect for the layer.
STEP 1
Move the current-time indicator back to Frame 0. Make sure the opacity for Circle 1 is 100%. At the Opacity property in the timeline, click on the stopwatch to add a keyframe.

STEP 2
Move the current-time indicator to 01:00f. Change the opacity of Circle 1 to 0%. Notice that a keyframe is added to the timeline at 01:00f once the opacity is changed.

STEP 3
Try to slowly drag the current-time indicator back to Frame 0. Did you see the circle start to fade in as it is moving to the left? Awesome!
Takeaway: You can have multiple animation properties change across time for a single layer to create rich UI animation.
Let’s go for more awesomeness!
Scale Animation
In order to animate the scaling of the layer, you must turn the corresponding layer to a Smart Object.
STEP 1
Create a new circle and name it Circle 2. At the layer panel, right click on it > Convert to Smart Object. If you done it right, you should be able to see 3 animation properties for Circle 2 – Transform, Opacity and Style. Transform property is the one that we will use for the scaling animation.

STEP 2
Make sure the current-time indicator is at Frame 0. At the Transform property, click on the Stopwatch to add a keyframe.
 STEP 3

Move the current-time indicator to 01:00f. Press Ctrl+T (Command + T on Mac) to initiate the transform action, and resize it to 20% from the original size. A keyframe should be automatically added into the timeline.
 STEP 4

Try to slowly drag the current-time indicator back to Frame 0. Circle 2 should be now scales to the original size. Move the current-time indicator to 01:00f again. Now, move Circle 2 to the right. Slowly drag the current-time indicator back to Frame 0 – now Circle 2 will move from left to the right and scales from 100% to 20% of it’s size in 1 second. Isn’t this fun?
Takeaway: To achieve scale animation, a layer must be converted to a smart object. The transform property of a smart object doesn’t only covers scaling, but also position changes, and certain transformation like rotation and flipping.
Style Change
Now you most likely have the idea how the animation properties work in Photoshop. Style property is pretty straightforward – most of the changes in layer style will be animated across time, given the style at the start and end state is different.
STEP 1
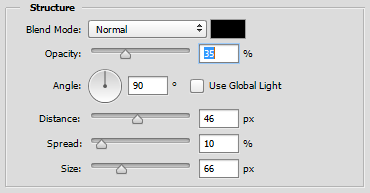
Create a new circle in white color, and name it Circle 3. Apply the drop shadow layer style with the following configuration (z-depth = 1).
 STEP 2

Once the drop shadow is applied, move the current-time indicator to Frame 0, then click on the Stopwatch for Style to add a keyframe.
 STEP 3

Move the current-time indicator to 01:00f. Then apply the following drop shadow configuration to Circle 3 (z-depth = 5).
 STEP 4

Once the new drop shadow configuration is applied, a keyframe should be automatically added into the timeline. Drag the current-time indicator to Frame 0, you should notice that the shadow style changes across time (z-depth from 5 to 1). Can you feel the circle is elevated from the base layer (Frame 0 to 60) and drop back to the base layer (Frame 60 to 0)?

Takeaway: Style change with sliders, most of the time, will be animated and can be used to create some nice animation effects like z-depth elevation or glowing effect.
Export and Show the World
Now you have some nicely animated circles that change position, fade out, scale, and have z-depth elevation – of course you want to export it and show it to the world, right? There are 2 options here – video or gif file. If you need to do some post-production for a gif file (for example, framing it to a phone), you would want to export it as a video. Just press on the arrow icon at the bottom left of the Timeline panel, and you will see the Render Video panel. The default settings will be just fine, though you have to have QuickTime installed if you intended to export it to a .mov file.
If you just want to export the animation to a gif file, go to File > Save for Web… to initiate the export – it will take some time to load all the frames (due to the resolution). Here I published my preferred settings for the export, but feel free to adjust based on your needs. For the image size, if you want it to animate smoother and faster on the mobile, you might want to resize it to 25% of the original size, otherwise you can leave it as it is.

Challenge
A small challenge for you – if you have seen my sneak peak of the tutorial gif file, I have 4 white circles changing their styles in sequence, but at a different time for each of them. Let’s try to do this!

I hope you have enjoy this UI Animation in Photoshop Tutorial #1 and don’t forget to send me feedback! I will definitely work on #2 for some advanced animations that you can make using Photoshop. Until next time!
Some have asked me for the PSD file, so here it is!

Great Job mate, Such a useful tutorial! But, I was wondring if you can share the PSD file for the animation. Moreover, I wanted also to copy the full z-depth settings since it’s in px rather than dp.
Thank you in advance
Regards
Hey there,
I will share it later today. 🙂
Taylor
Hey there,
Here’s the PSD 🙂
https://db.tt/C0JY7zGi
Taylor Ling
Thanks 😉
I really loved this one. But im wondering if you have an special technique to make this on android, or you just do this, and give it to a programmer and he-ll know how to do it…
Thanks!
Hey Joaquin,
Most of the time it’s the latter case – the dev will try to figure out how to do it in code. It will be tricky at first, but once they found the way to do it, they will know what to do.
Taylor Ling
please do not forget to share PSD :))))
Hey,
Sure – here you go!
https://db.tt/C0JY7zGi
Taylor Ling
That’s what i’m looking for…Love that…
looking forward to the next tutorial.
Hey, I think photoshop it’s the worst tool for that, please try to use Quartz+origami.
Hey,
Photoshop might not be the best tool (as I mentioned), but it is definitely not the worst tool – I have been using it for my professional works and it works just fine. Surely Quartz and Origami does the interaction part pretty well, but the learning curve can be very steep compared to some other tools. The idea of using Photoshop to mock the animation is just meant to better communicate the animation/transition idea to the developers for development purpose, so any tool that does the job well, is a good tool.
Taylor Ling
Thanks so much Taylor!
Hi Taylor. Thank you for the tutorial. I never knew animations was possible in Photoshop! This is very helpful for creating app mockups. I follow your blog for various UI design tips.
Great, I used to do before the animation is 30fps, but will be more fluent with the use of 60fps perfect, thank you very much!
I think it is not possible, but is there a way to do it in Gimp?
Hey,
No, unfortunately, it’s not possible to do that in GIMP.
Taylor